Monday, October 8, 2012

50th Anniversary

Not many people get to celebrate 50 yrs, but our Village did and what a wonderful weekend we had.


It being Thanksgiving weekend my parents came to celebrate with us. Friday night started off with a Welcome Reception, where a local Harpest played vendors had tables (I was one) and beverages were available (I may of had one of those too).

See my first display of clothes


There were also celebrations held at the Golden Years Senior's Lodge and later the Band Lovely Bones played at the curling rink for those that wanted to dance. Unfortunatly after working all day and then setting up as a vendor 8 o'clock came and I was ready for bed.
 
 
Saturday started with a Pancake Breakfast hosted by the Legion, and at 10 o'clock my parents went on a hike at Mile 53, which was at one time a busy little railway town. I took the kids to the Magician Clinton Gray who was very entertaining, and entertained everyone young and old in the audience.
 
There were many other activities we couldn't take in but wished we could have: Avalanche awareness by Iliya Storm, Prospecting for Gold with Joe Gagnon we also missed.
 
I did manage to get the kids from the magic show to the Big Foot Poker Walk. We followed our map around town on the newly completed Big Foot Trail going from business to business collecting cards for our Poker hand. We ended at the Visitor Information Centre where we turned our hands in and the kids got free cotton candy.
 
We then raced home to quickly cook dinner and get back over to the Legion where Duane Steele played for us. I love it when Country Stars come and play at our small local venues it's so much more personal. Not many other places do you get to chat with Country music stars face to face and you don't stand in line for hrs for a signed CD.
After the concert I took the parents back to my place, dropped them off and went to pick up the girls who a friend was watching for me. Then off to bed we went, but most everyone else from our Village headed off to the airport for a concert put on by the Famous Players Band. What a night I was told, where else could you dance on the tarmac, there was free camping and shuttling back to town so there was no drinking and driving.
 
Sunday started off early with my parents heading on a Helicopter Flight. Yellowhead Helicoptors offered flights this weekend only $50 a person to fly over the proposed Glacier Resort.
 
 
My parents had a beautiful flight..
I headed back to the Information Centre to be ready for the Anniversary Celebration where the Mayor gave a speech, Duane Steele sang and cake was served to everyone.
 
 
The Harvest Dinner was served from 4-6pm and then Drive In Movies began the first one as for the kids Chronicles of Narnia and then Grease showed from 9-11. Where else could you catch a Drive In Show!
 

Happy 50th Anniversary Valemount
 
Here's to 50 more!


Tuesday, October 2, 2012

Life in Balance

Being a single mom, means life is all about balance. Some days there's more of it then others. Just like any parent you worry about:
Am I spending enough time with the kids?
Did I spend enough time with each (if you have more then one) of the kids
I was I too short with any of them?
Was the dinner you made (or bought) healthy enough?
Is the house clean still standing
What are you making them for lunch tomorrow, do you have enough fruit, veggies etc. A parents life you are constantly thinking about others. We have to remember to take time out for ourselves. For me that means sewing that's what I do for me, which really isn't for me because everything I sew is either for my girls (I'd sew for my son but he's not one for ruffles) or orders for dresses.
I'm so very tempted to take sometime for me tonight and not sew but our Village is having it's 50th Anniversary which is going to be so much fun! Ok back on topic, on the Friday night at the reception dinner there's an opportunity for local vendors to put in a table. I of course put a table in, but then quickly panicked that I needed stock for my table so off to the basement I went. Well as soon as I could which means after work, after supper, after baths and then after girls are in bed because sewing with Baby B is an adventure in it's self. You wont know how many time's she has climbed up and spun the tension dials on my serger, I cry every time.  So once the girls are in bed I can devote my evening to sewing, so around 8ish give or take an hr I can begin. I usually last until 11 or midnight but tonight  (I didn't even have to cook thank you thank you Sofia and the kids skipped the bath) here I sit and gasp it's only 8:15 I should be sewing, I only have 2 more nights to accomplish my goal and I've run out of energy. Life is all about Balance and tonight I'm going to balance my head on a pillow.
Balance it's everywhere in Life

Thursday, September 20, 2012

Day 2

The second day of our trip took us to Calaway Park, I have to say I've been here before many times as a little girl. I spent the first 7 years of my life living in Cochrane AB. Not that I can remember any of those trips, but the one thing I do remember is after riding the roller coaster for the first time, when getting off I told my mom "I left my heart on the ride" mom said well then lets go get it and I don't remember but mom said I freaked out and refused to go again. I guess I found the ride a little scary then again I was 7.

This must not have scarred me for life.. I love the thrill of rides of all kinds.

I do have a love for rides that is not shared by my children. I convinced my eldest to join me on a ride. That is until it was our turn to get on the ride, my son then bailed since I'd already stood in line I got on by myself.....


I love rides, unfortunatly my two little ones thought I was never coming back and cried the duration of my ride, Fortunatly for me I couldn't hear them and had fun all by myself.
AJ did manage to get a few rides in on his own, not sure he's ready for the HWY yet but it's a start.

The boys had fun soaking strangers, although they did not stay dry themselves.
 
The Balloon ride was a big hit, we watched them go round and round and round.
 
 
LB's favorite ride of course was the Carousel, all in all Calaway Park was a great place to go.
 
Come back for Day 3!

Wednesday, September 19, 2012

End of Summer Post

It's been a few months since I've had time to update.. Life's been very busy working full time chasing 3 kids, daily trips to Day Care then home for dinner there never seems to be enough time in the day. Even the weekends are packed, I'm not quite sure what gets accompished but Monday arrives much to quickly for my liking. I'm occasionaly able to squeeze an outfit or two out of my sewing room but not as often as I would like.

One of the best thing we did was get in a summer vacation, it was only 10 days long but it was one of the best trips I've taken with the kids.

We got up early saturday morning and drove to Calgary AB which is 534km which would take the average person less then the 7hrs it says but when you have to stop to nurse one child and stop for bathroom breaks for the other two it sure drags out your travel time.

 We stopped on our way through Jasper Glacier Park and took in the waterfalls, some enjoyed them more then others.
 
AJ Climbed up the first set to check out the higher set of falls.

We stopped in Banff to meet up with my friend Leigh and her kids and since we live so rural I don't own a cell phone... "Gasp" I know how old fashioned of me.. ok i own one but it's a pay as you go, and even bought time to go on it but realized once we were on the hwy it had been so long since I'd added minutes to it my number had been given away.. oh well obviously I wasn't using it much.
sorry no pics of Banff it was so crazy busy there we were happy just to meet up with Leigh and nurse the babies and then get back out on the hwy and head to Calgary.

Baby B    LB   My friends son sleeping under the blue blanket
First day there we checked in to our hotel 1 room 2 moms, 3 girls and 2 boys lol we shared 1 queen bed and 1 king sized bed and an air mattress for all of us and the kids.. Believe it or not the kids all went to bed each night without a fight.

Okay on to Day 1 The Zoo

The kids loved seeing all the animals (we didn't make it over to the North America section) where we live it's not unusual to see Deer, Big Horn Sheep, Elk even the odd Bear or Grizzly don't get me wrong these are all wonderful animals but it's nice to expose the kids to some of the more exotic animals on our planet.


We made it to the Zoo nice and early, if you get there early enough you'll get to see some of the animals being fed. We made it just in time to watch the Red Panda eat his breakfast.


The Tigress had triplets this summer and we got to watch them playing with each other and their mom.


One of the many handy things Big Brothers are good for... a lift above the crowd.


Both the girls loved the Elephants (don't you just love the coordinating outfits I'm such a sucker for matching girls)
4 out of 5 of the kids (the littlest was sleeping in the stroller)
She even had a coordinating outfit to match my girls I drew the line on dressing the boys in pink (which I know they were very greatful for)


I love how patient AJ is with these two he waited eagerly for the "Train" with them and then walked along while these two definatly enjoyed the "Train"
Pure Joy on these two happy faces


 Stay Tuned for Day Two's Activities......................................


Thursday, May 17, 2012

I'm Back....

After 2 months I'm back, I returned to work in March, you know not sewing or child raising work but my 9-5 job. Don't get me wrong I quite enjoyed staying home with the girls for my year but I also enjoy working outside of the home. So instead of 2 jobs returning to work has bumped me up to 3 that I would almost call full-time jobs.
Job 1: Mom (that sums it all up
Job 2: Seamstress, Designer and Creator
Job 3: Administration Assistant

In between working at the office and keeping three kids fed, clothed and relatively clean I'm still turning out a few creations. I even have started taking orders for outfits. I am loving it.

Here are a few creations I've come up with. Most patterns of course are from my favorite company Create Kids Couture.

Hannah's Pillow Case Bubble Romper Pattern by Create Kids Couture(their pattern is free on Fabric.com)


Felicity's Peasant Top/Dress Pattern By Create Kids Couture


Natalie's Ruffled Butt Romper, Pattern by Create Kids Couture


Elena's Peasant Dress, Pattern By Create Kids Couture


Custom Order Knot Dress
Meadow's Summer Dress, Design by 4 Funky Funk's Yes thats Mine.....

Daisy Sundress, a mix of patterns some from Create Kids Couture
Combination of Helen's Maxi Dress and Faith's Shirred Sundress


Jelly Roll Bubble Dress, Custom Order Design by 4 Funky Funk's another one that's all Mine


Hope you enjoy my Photo Bomb, I sure enjoyed creating these dresses...

* On a side note everyone asks "When do you find time to sew?"
My response "When B wakes up at 5am, I get up and take her downstairs to my sewing studio (that's what I call me new space in the basement) and sew until 7, then get ready for my job away from home"

Tuesday, March 27, 2012

It's been a while

It's been a while since I posted on here, needless to say I've been busy. Aren't we all?
I've returned to work yay (ok I do like working and it definitely helps pay the bills but I'd rather be at home with the girls and sewing). I've been busy getting some custom orders done... I love the patterns from Create Kids Couture,  they are easy to follow and easy to sew.
Doesn't it look like a Bumble Bee

I love the ruffled butt romper it's too cute.

 
So hopefully I can post more often, but if I don't then you know I'm busy sewing and forgetting to take pictures.

Tuesday, February 14, 2012

Valentine's Day


Happy Valentine’s Day everyone

We don’t celebrate Valentine’s Day with lots of gifts and cards, instead (because I remembered a day ahead) the kids each got a small box of chocolates and a card from their grandparents who had just been here for a visit the day before.

What we did do for Valentine’s Day was have everyone’s favorite dinner….. Spaghetti , with a little red dye in the water to turn the noodles “Pink”  and of course red meat sauce and “Pink” Lemonade. LB thought it was pretty neat to have pink noodles..

Gourmet at the Funk House
Baby B enjoying the pink noodles


We even had cupcakes with pink icing not made by me, I bought them at the local grocery store this time.


The kids had such a blast with dinner tonight, might have to be creative a little more often.


I felt like I failed Valentine's Day this year, I just did not have time for baking as I’ve been busy building my pantries.. yes that’s plural I have two pantries that I’m putting together, one is finished and the other just needs the top cabinet built and lifted up. (these are very heavy). So I can build it I just need to have a friend over to help lift it.


See my half finished kitchen it’s almost done…yay

On a very exciting note I get to test a pattern for a company, shhh it’s a secret so I can't show you until they release the pattern on their website, but I’m super excited it’s sew cute!

Wednesday, February 8, 2012

BUBBLE DRESS TUTORIAL

 Ever wonder how to make a little girls Bubble Dress, well you can with just these few items

* My Bubble Dress is a size 2/3 (for a very small 3yr old) but it's all based on yopur bodice size and how much you gather the skirts.

1.       Jelly Roll of Fabric 20 Strips 42” long (keep 5 separate you can mix and match or coordinate) I got mine from Walmart from the Fabric Palette collections.
2.       1 coordinating fat quarter 18x20 inch piece of fabric
3.       1 remnant of fabric that is 18X36 you can have a smaller/shorter piece as this is for the lining and the length of the strips end up being 21” long and if your lining is shorter your dress is short it’s all in the look you want.
4.       1 inch Elastic
5.       Sleeveless Bodice pattern (I have one that I’ve been using for  a while can’t remember where I found it)
6.       Sewing machine
7.       Iron
8.       Thread
9.       Pins

I stitched  15 of my Jelly Roll strips together side by side, I kept 5 of these separate for the neck straps and waist straps and front bodice coordinating piece.

Once you have all 15 stitched together it looked like this.
9 of my 15 strips

Because each strip is 42” long I then cut my 15 striped piece in half and stitched them to the side of my first batch of 15 strips.  I then had 30, 21 inch strips in a row.
I then sewed the first and last strips together so it became a big tube.

You can’t really tell it’s a tube of fabric but aren’t the colors beautiful.

I then cut out my bodice a front and back  (2 pieces) out of the coordinating fabric 18x20 inch, as well I used the same pattern pieces to cut  lining. I added little pleats at the top and bottom on the front of the bodice for more style. I quite like how it turned out.


All I did was make the bodice longer between the shoulders and measured in ½ inch for two pleats on each side right where I wanted to place my straps.
1/2 inch pleats

The straps are two of the strips that were set a side. I coordinated mine to match the front and back , I stitched them right sides together and then turned them through and top stitched each strap to keep them looking neat and tidy after washings.

I placed the straps in between the right sides of the bodice best way to understand is to see a picture
Straps on Bodice

And pinned it all in place
Sew across the top of the bodice and do the same with the back bodice piece, putting right sides together and stitching across the top. (You don’t have to, but I Ironed each bodice piece)

Then flip the two pieces open and lay each on top of the other and pin the right sides together  (I don’t have a picture for that one and it’s hard to describe) and stitch down each for the side seams. It becomes another tube.
Flip them back around so wrong sides are together the neck straps are loose at one end and attached to the top of the bodice. Now top stitch the upper edge of the bodice starting at a side seam (keeps it hidden) and stitch all the way around.

At this time you can take the other two strips of fabric you had set aside (we had two for the neck straps and now the 2 for the waist)

I stitched the two miss matched pieces right sides together, then turn them through so the right sides are out again and top stitch the strap. I then cut it in half. And set aside.


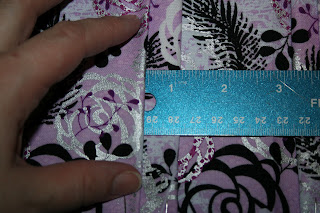
I then took the last strip for the coordinating fabric for my front bodice piece and cut a strip the length of my finished bodice (added a ½ inch) by 4 ½ inches wide. Fold this piece in half right sides together so it’s now 2 ¼ inches wide and iron flat. I then placed the two waist straps (remember we just cut those in half and set aside) in between the right sides of the front bodice piece so the raw edges are together. I matched the stitch seams with the bodice where the back and front are stitched. Stitch down each side of your coordinating bodice piece.


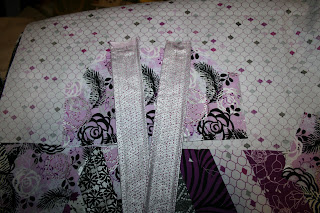
At this time I found it easiest to stitch this to the bodice. I lined up the raw edges of the coordinating piece to the bodice and top stitched up the edges and across top of the coordinating piece so it is now a part of the bodice.


Take your bodice (now one big piece) and place your piece of elastic into the back piece inside, pinning the ends of your elastic between the stitch lines and pin into place.
Finished elastic casing

I find this hard to describe but easy to do, once you have your elastic pinned in place stitch down your seam line (careful of your pin) to start creating your elastic casing to hold the elastic in place. Once you get just past the elastic leave your needle down and then turn your fabric so you are sewing towards yourself and the other end of the back bodice piece. You are going to sew just along the elastic (don’t sew the elastic) and as you go pull the elastic with your left hand away from yourself and with your right guide the fabric through the machine. When you get to the seam line with your sewing machine foot keep the needle down lift the foot and turn the fabric again so you are stitching back up to the top of the bodice. Ta da your elastic casing. If you know another away that works better for you do it that way.

Now back to the Bubble skirt portion of this tutorial.

I surged the edges of my top skirt just to clean up all the loose threads from stitching the strips together
 (this isn’t a must but helped me clean it up)

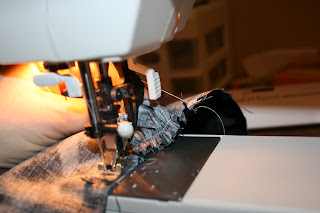
Take your beautiful tube of colorful strips and sew a gathering stitch all the way around.
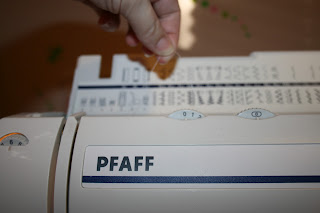
To make your gathering stitch, I took maybe 3 stitches then I found what works for me is to reach up with my left hand (I’m right handed) and pinch my thread with my fingers.
pinch thread to gather while you stitch

Keeping my tension set at it’s loosest stitch which is 6 on my Pfaff, and pinch the thread and stitch away and it gathers my fabric for me, works perfect every time.
Gathered Nicely
Gather the top and bottom of your top skirt (the colorful strips)

Take your remanent (Lining piece) of fabric and sew the short ends together, on mine it was the two 18 inch sides and make another tube.

You will want to do the gather stitch on the top and bottom of this as well.

Place the right sides of your lining and your top skirt and place together, make sure you have the correct size to go around your child’s legs if you gather too much it will be too small and they will not be able to run and walk in it. My child is a small size 3 and the total circumference of the bottom of the skirt is 32 inches.  Stitch together now turn back around so the right sides are out. This seam will be the bottom of your skirt.

Take the remaining raw edges of your skirt and linings put wrong sides together, I basted these together loosen enough so I could gather it smaller to match the size of the bodice. Place your bodice right side and raw edges of skirt right sides together, pin and stitch.
Bodice pinned to the skirt right sides together

Turn it right side out and admire your creation.

This was very easy and fun to make

This is my first tutorial so please bare with me while take this running leap into blogging and tutorials